Fuel Tank
and Fuel Tank
Valve Cleanout
Johnson H and T Series
By David Poche
Causes of the Buildup: An often overlooked problem with unmaintained H and T series outboards involves the clogging of the fuel tank valve. Clogged tank valves result in outboards that run for only a short time and then stop. This is because the engine is only burning the primer pump fuel and what little fuel gets past the clog and into the carburetor float bowl. Of course, other ailments for the motor could cause the same result.
"Clogging" of the fuel delivery system on an outboard usually is the result of keeping fuel in the tank for long periods. The slow degradation of the outboard fuel/oil mixture results in gummy, sticky deposits that are frequently referred to as "varnish" or "gum". These deposits can eventually clog many of the pre-powerhead parts of the outboard including the carburetor orifices, fuel supply lines, fuel valves, and even the fuel tank and fuel tank screen assembly.
Modern gasoline/oil mixtures consist of petroleum distillates and gasoline additives (including ethanol). These distillates are made up of hydrocarbon chains of varying lengths. The lighter or shorter hydrocarbon chains are referred to as "aromatics" while the heavier or longer chains of carbon and hydrogen are called "asphaltenes".
When the gasoline/oil mixture goes "stale" in the tank, the first thing that usually happens is that many of the aromatic or shorter hydrocarbon chains vaporize or evaporate from the mixture. This leaves the longer hydrocarbon chains or asphaltenes. And as the name implies, the gasoline/oil mixture usually becomes black in color. If you pass stale gas/oil mixtures through a coffee filter, you can usually collect small solid particles of gum suspended in the fuel mixture. Sometimes these longer chains take the form of waxes.
Another process affecting the hydrocarbon chains is oxidation. Here the chains are broken down to form new compounds. When this happens, the gas/oil mixture usually smells.
The last process affecting the gasoline/oil mix in the tank is water contamination created via condensation in the top of the fuel tank when the temperature fluctuates. This contributes rust or metal oxides to the mix of cloggers. The ethanol in modern gasoline can also separate out and go to the bottom of the fuel tank in cold weather but this in turn helps to remove some of the water formed from condensation.
Over time, these cloggers can build up and further solidify. Fuel stabilizers like Stabil Marine or Sea Foam can help keep the fuel mixture from going stale but, in general, it is probably better to drain the fuel from the tank and carburetor after each use unless the outboard is used on a weekly basis.
It's simple to check for a fuel line clog (including the fuel filter): turn off the fuel at the valve, unscrew the fuel line at the carburetor and open the fuel valve. If the fuel line dribbles then you probably have a clogged fuel system.
|
|
|
Disassembly from Fuel Tank and Carburetor |
|
|
Probably one of the simplest ways to remove the fuel tank valve is detach the brass connection on the carburetor fuel line and unscrew the connector to the fuel tank screen assembly at the bottom of the fuel tank.
Once the fuel tank valve and connector to the fuel tank screen is free, detach the valve from the connector and carefully set the connector and fuel screen to one side to be worked on later. Detach the carburetor fuel line if you undid the assembly at the carburetor (see figure below).
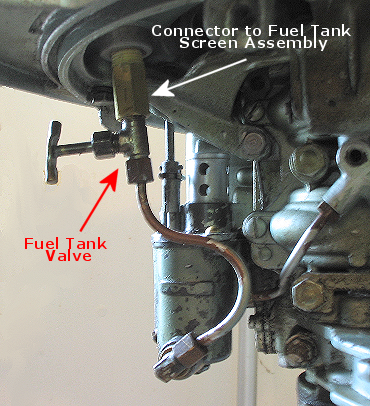
Gravity-fed fuel delivery system for Johnson H and T series. When the fuel tank valve is opened, fuel passes through a screen located within the fuel tank (attached to the connector just below the tank) from there it passes through a copper line to the base of the carburetor float bowl. If the valve appears to be blocked with stale fuel deposits, all components of the delivery system should be inspected and cleaned.
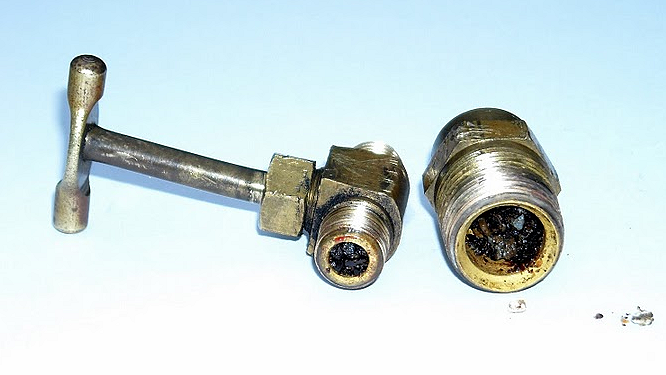
An obstructed fuel tank valve and fuel screen
connector. With this much blockage, it is best to remove and clear
the stem from the valve as well as the main valve body. Note that
the connector is also obstructed and that in this case, the fuel
tank screen (upper part of TN-28 375663) has been removed. Special
care must be made when cleaning the connector and fuel screen. See
discussion below.
(Photo:
"Land O Aches 2010",
AOMCI)
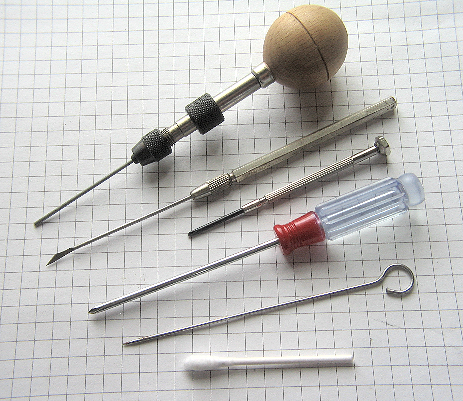
Typical tools used to clean out fuel tank valves and carburetor orifices used by the author. You will need to dig out gummy obstructions and clean the inner surfaces of the valve to do a top job. At the top, a pin drill with a small piece of "piano" wire. You can also use a fine drill in it. Next is a fine dissecting scalpel and two small screw drivers. Finally is a poultry trussing needle and a cutoff Que-Tip. Either end of the Que-tip can be used and works well when dipped carburetor cleaner.
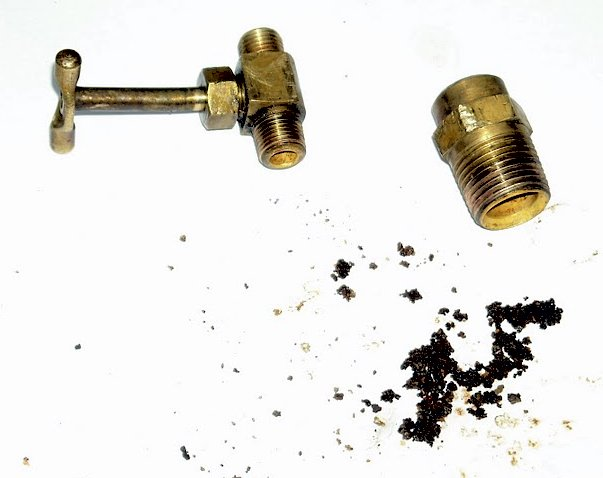
Black obstruction material scraped from valve and connector
(see discussion below).
(Photo:
"Land O Aches 2010",
AOMCI)
Special Care when Cleaning Connector and Fuel Screen Assembly: Normally, the fuel screen assembly consists of the connector and an attached fuel tank screen. The connector is best cleaned with the fuel screen vertical. If you do not do this, the obstruction fragments will fall into the screen and be trapped. This could cause fuel obstruction at the bottom of the screen. It will take several minutes to free the particles from the screen assembly if the fuel screen assembly and connector are not cleaned correctly.
|
|
|
Reassembly |
|
|
Reconnect the fuel delivery assembly as before. The threads should be sealed against leakage by using a thread sealer. Several have been recommended by AOMCI members.
Lloyd Lautner (senior member of the AOMCI) recommends using Permatex gasket sealer 300 on the brass pipe threads of the connector as well as the fuel valve threads. This is a non-hardening sealer that prevents corrosion of the aluminum threads of the tank and allows easy adjustment of the fuel valve stem to the lower cowl slot without leaking around the threads. Other AOMCI members have recommended the following sealers: Loctite Screw Lock, Gasoila, Rectorseal, Pipe Thread Compound TFE Paste (Ace Hardware) and Ptfe tape (gas resistant teflon tape). White Teflon tape is not recommended because it is not resistant to gasoline and it "strings" and can prevent valves from closing. The American Gas Association recommends a yellow AGA-approved tape which will not "string"
|
|
|
Fuel Tank Cleaning |
|
|
It is usually best to remove the gas tank first to provide access for cleaning. Basic gas tank removal for the H and T series is well covered at the Big Lure/ Little Lure website. The TN-28 is further complicated by the presence of the neutral shift cable and lever.
Before beginning to clean the inside of the fuel tank, it is necessary to remove the fuel tank screen assembly via the connector (see above discussion). This will prevent damage to the screen from cleaning abrasion objects (nuts, bolts and screws). It is best to purchase a 1/2 inch brass cap to screw into the connector hole in the bottom of the tank (see figure below).
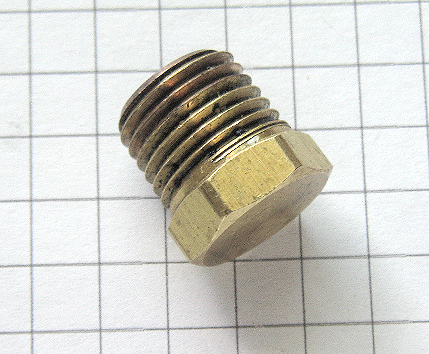
Before beginning to clean the inside of the fuel tank, non-damage to the delicate fuel tank screen can be prevented by substituting a 1/2 inch brass cap like the one shown above for the tank connector and filter screen.
Various AOMCI members have suggested several liquids to clean fuel tanks including lacquer thinner, acetone, ammonia, rust solvent part of Kreem tank coating kits and Super Clean, CLR, and LAs Totally Awesome, Simple Green, and Purple Power cleaners. Electrolysis has also been proposed. BEWARE: Some liquids like acetone and Super Clean can damage the tank paint. Test liquid on a non-exposed painted area first.
Cleaning usually by putting a cleaner into the tank shaking it up then letting it set for a few hours. For really stubborn deposits, some owners add nuts and bolts to the tank and shake vigorously several times with a rest period of a few hours. Flush the tank with water after cleaning and follow with 100% denatured alcohol to quickly adsorb the water.
|
|
|
TN-28 Tank Fuel Filter Cleaning |
|
|
The TN-28 tank fuel filter is not a simple screen but a sintered bronze filter stack glued to the tank connector. Since these filters are more effective at trapping smaller particles than screens they will frequently have to be serviced and cleaned.
Once the fuel tank connector has been removed from the tank, the brass connector will need to be separated from the bronze filter tower. These are sometimes soldered into place but most of the time it is easy to separate the two pieces.
Lloyd Lautner recommends that the filter stack be soaked in acetone for 10 to 15 minutes or overnight depending upon how muck the stack has trapped. After soaking, compressed air is used to "reverse blow" the filter stack and move the trapped gasoline and oil lacquers to the surface of the stack. You will be able to tell how effective the acetone is working by the amount of bubbles created at the surface of the stack when under air compression. Several cycles of acetone soaking might be required. Lacquer thinner can also be used as a cleaning agent. After washout with water, mouth test by blowing into stack. Any obstruction to air flow merits more cleaning. The next round of cleaning uses cleaners like Simply Green or Purple Power and much like above involves 30 minute soaking followed by compressed air blowouts. These are followed by water cleaning and further breath testing.
When you become convinced that the stack is clean of filter lacquers, it's time to reassemble.
Use a very small amount of CA-glue gel (super glue gel in figure below) to both the bottom of the filter stack and inside the fuel line connector. Gel or thickened CA-glue is better to prevent the glue from clogging the filter stack. Ca-glue is fuel proof and will allow easy separation on later cleanings. Allow the stack to dry in the vertical position with the connector at the base.
Next, clean the aluminum corrosion from the inside of the tank threads and the brass threads of the connector using small brushes, Tooth paste brushes are particularly effective on the tank cleaning. Using an acid brush, paint both the tank threads and the connector threads with a non-hardening gasket sealer. The sealer has a further advantage in that it inhibits the galvanic corrosion between the aluminum of the tank and the brass of the connector. After applying the sealer, insert connector into tank and tighten.
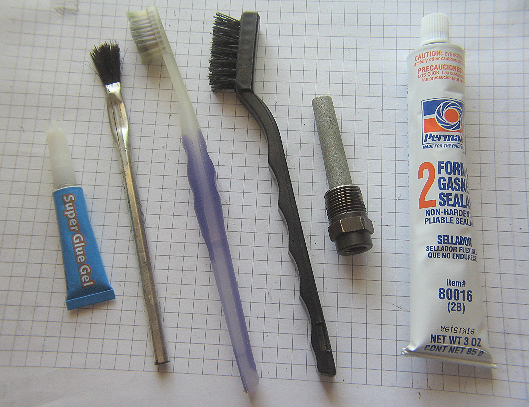
Shown are the glued fuel tank connector and bronze filter stack that was put together with CA-glue gel (shown) Two of the brushes used to clean the tank and brass connector of corrosion and old sealant. The acid brush and non-hardening gasket sealer are used to paint the tank and connector threads.
On reassembly, paint the non-hardening gasket sealer on the upper threads of the fuel valve to allow ease of alignment of the valve with the slot on the lower engine cowling. See above for other AOMCI recommendations for sealers.
TIP: It is better to align the fuel valve to the lower engine cowling slot by temporally attaching the lower cowling and aligning the valve before compression fittings of the lower fuel line are attached to the fuel valve and carburetor.